Launching a new online shop or switching to a new platform can be confusing. Since I have been selling on Storenvy for five years, I want to use my experience to help new sellers get started on this platform with this series of posts aimed to help you launch your shop & maximize your experience on Storenvy! This post will detail how to list products on Storenvy to ensure no missed steps with explanations for each function.
Go to the ‘Product’ page
Login into your Storenvy Account and go to your dashboard using this shortcut to go directly to the Products Tab of the Admin panel.
Adding a new product
Click the “Add Product” button at the top right of your screen. This screen also allows you to see all the products in shop as well as a breakdown by category. If you need to add a category it will also be done from this tab by selecting “Manage Collections” and adding item categories as needed for each product category you plan to sell.
Enter a product title, price & category
Unlike other selling sites, there is no need for keyword stuffing titles on Storenvy. Keep titles relative& descriptive of the product, explanatory & easy to understand. Put in your price, then choose which category & subcategories, if applicable, is best suited for your product.

Is your product active, hidden (not ready to be sold yet) or coming soon? Select from these three options in the top left. Below this, you will choose whether or not this particular item is visible for sale in the Storenvy Marketplace. You add your product to the proper collection & select it’s shipping group on the left hand sidebar as well.
Below the title, fill in your item description. Here is a
great post on writing product descriptions that help with SEO & driving sales.
Below product categories (which you can tweak as needed on this page) you can choose to add shipping notes, which is product information that will be printed on the packing slip (think care instructions or directions for use).
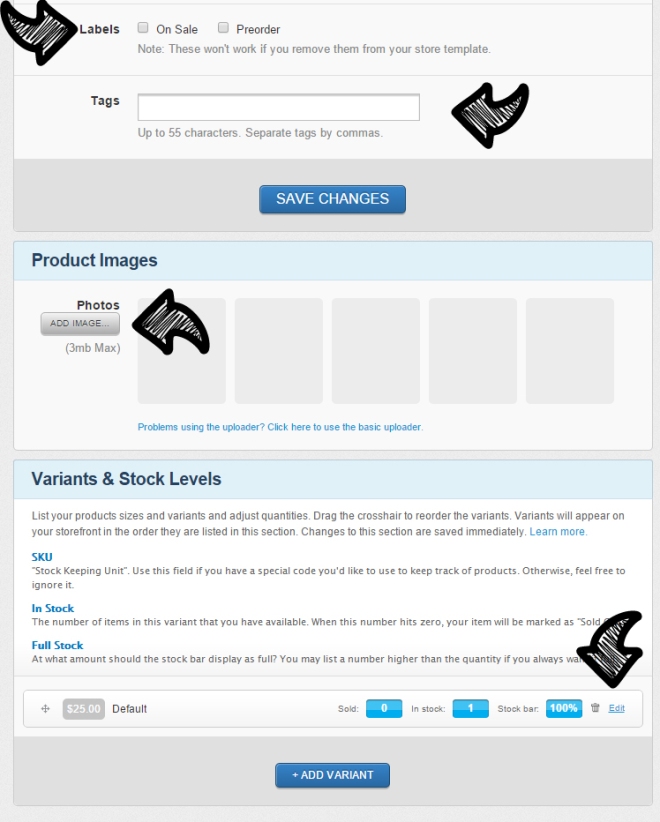
Right below shipping notes is the labels for your products – you can apply these if you have items on sale or if the items are available for pre-order.
Then, add your tags. You have up to 55 characters, which isn’t as limiting as you might think. This levels the playing field in the marketplace by only allowing sellers to use the most relevant keywords for searching. Plus, pro tip: you don’t have to use spaces between commas, so you can tag,keywords,like,this,to,better,utilize,space. Yay!
Next up, add your images. You can upload up to five images to Storenvy that are each less than 3mb. Since both your custom Storenvy shop & the Marketplace display items with squared preview photos, it is best to edit your photos before uploading them to ensure they aren’t cropped in the preview & to create dynamic images fully displaying your product in marketplace searches, which will result in more click-throughs to your shop.
At the very bottom, you will add your variants. Scroll down to learn more about those!
To add various color & size options click the “Add Variants” button and enter the appropriate information. If you chose to leave the title to “Default” it will simply say “Add to cart” but if you change the title or have multiple variants, it will prompt buyers to select which item they want to add to their carts from a drop down menu. For each item offered (various sizes of shirts, different color options for stuffed toys, shimmer or no shimmer eye shadow, for some examples) you can click “add variant” and input info as needed for each. You can also set various price options for different product options, like different sizes of shirts or art prints, for each variant as well.
To save your new product, scroll back up to the Tags section & click “Save Product” then give yourself a pat on the back – you’ve just added your first product to Storenvy!
(Visited 28,192 time, 2 visit today)


