How to take Great Pictures of Small Products
To be a successful online seller you need skills in so many more areas besides making or finding great products to sell. Photography is one those skills and one of the most important ones too! If you are lucky you may have a friend who is a great photographer and willing to take your pictures for you or if you make a lot of money you can pay a professional to do it for you. For the rest of us we need to do the best we can.
Camera
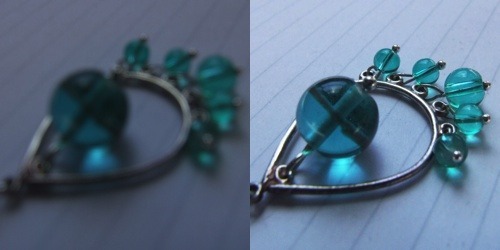
I’m not going to lie, you need a decent camera. Not a top-of-the-range SLR but – for jewelry and other small things at least – one that has a macro mode. Don’t worry about megapixels, even the cheapest camera phone these days has more than enough megapixels for online photos. The quality of the image is important, some cameras can make it look like its foggy or there was a sandstorm. However this is another one you shouldn’t need to worry about – most cameras with a macro mode will be decent quality. Why do I need a macro mode? Macro mode allows you to take real closeups of your jewelry and still stay in focus. If you try to take closeups without it you will find it focuses on the background instead of the jewelry and then your beautiful jewelry will look blurred. Macro mode also de-focuses the background so it doesn’t distract the viewer from the intended focus – the jewelry.
When taking your picture you should try to fill as much of the image as possible with your item, without putting it out of focus. If you don’t have zoom this means getting as close as you can, if you do have zoom it depends a lot on the camera whether you can use it to “get closer” or not. If you have a more advanced camera you can buy a macro filter which screws onto the front of your lens and helps a lot.
Light
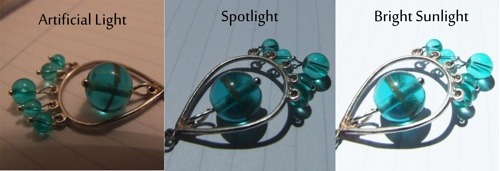
Lighting is extremely important too. Trying to take pictures in artificial light leads to a yellow tinge to the item and the picture in general. Taking photos under a spotlight can work but tends to lead to areas which are very bright next to areas which are dark and dramatic and distracting shadows. Whilst natural light is best, bright sunshine isn’t always the best choice either as it can lead to pictures being overexposed and, again, very dramatic shadows. You can tone down direct sunlight by placing a thin white cloth in between the sun and the item to be photographed but the easiest thing to do is to find a well-lit spot that is out of the direct beam of the sun.
Background
The background you use for your pictures can have a huge impact on the way the viewer sees your items. Some aspects of choosing a background are common sense and its mostly just a case of trying different things until you find one that works with your pieces and fits with your style too. Keeping the same background for all your photos can also go a long way towards giving your shop a cohesive feel and making your items instantly recognizable as yours!
Natural backgrounds like wood or rocks tend to work very well but you still need to be careful with the colors. I would not use a wood background for a picture of copper jewelry, for example, because the copper would just blend into the wood.
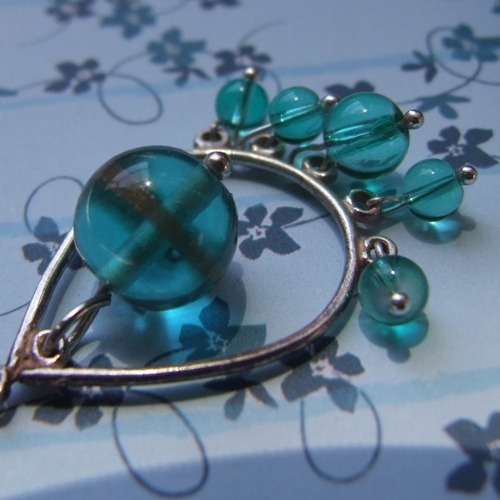
A patterned background can look beautiful and add a certain style to all your pictures. Book pages are very popular, or floral and patterned paper. However you should make sure that the pattern is not too bold and doesn’t detract from your jewelry in any way. A textured but plain-colored background, such as fabric, textured paper, rock or lace can be a good middle ground.

A bright or contrasting background can make a bold statement and attract attention to your pieces. Just be careful it doesn’t clash or alter the color perceptions of your item. This pink background makes the turquoise beads look a different shade and presenting colors accurately online is difficult enough without complications like this!
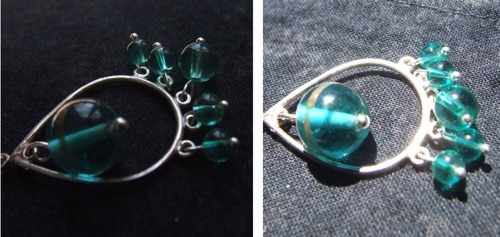
Be very careful with a black background as it can suck the light out of your picture (left). If you use very bright light to compensate you end up with an overexposed picture instead (right). Props Some items, especially earrings may work better if they are hung up rather than laid flat. Many people use a glass to hang them from with their background behind (make sure the glass is spotless!) but I find it can work well to stuff tissue paper into the glass and then hang the earrings so the direct background is the paper.

You can also use a frame or hook of some kind to hang the items on and then place whatever background you want behind it. If your support is going to be visible in your final image, make sure it is absolutely horizontal – it is disconcerting to see something that you know is level, presented at an angle. Items such as necklaces, on the other hand, may look good draped over an uneven surface, such as a rock, or simply laid out in an interesting manner.

